This is my personal blog showcasing my digital creations. Most images created using Blender, an open-source and extremely versatile 3D creation package, available at: www.blender.org
This is the Forth Bridge, a cantilever bridge built for rail traffic in 1890.
The 1st draft gets the basic shape sorted out, I need to go back and add grunge and textures.
2d draft - worked on the textures and a better water surface. I managed to figure out a simple way of adding some mist to the background - I added a very large cube with a volumetric scattering material in the background rather than fiddling with the unintended near-field effects of applying mist to the whole scene.
It takes a bit of effort to get from a sculpted head to a working model ready for posing and animation. Sculpting creates an enormous number of polygons, far too much to be useful in further scenes and models without some work. Also, for posing and animation, the flow of edge-loops in the model has to work, or you get some pretty ugly deformation.
After an evening of retopo work on the head, making a suit, and using the Rigify add-on for Blender, I have a poseable model.
It will be a couple of weeks until I can go through the same process with the Darling and Salmond sculpts. And I am lining up Farage as a late addition. With that done, I will be reviewing old Spitting Image footage for some inspiration on political situation comedy.
I am making the Cameron model available under CC-Attrib. You can grab a copy of the Blend file here. Enjoy :)
Winston Smith works for the Ministry of Truth in London, chief city of Airstrip One. Big Brother stares out from every poster, the Thought Police uncover every act of betrayal. When Winston finds love with Julia, he discovers that life does not have to be dull and deadening, and awakens to new possibilities. Despite the police helicopters that hover and circle overhead, Winston and Julia begin to question the Party; they are drawn towards conspiracy. Yet Big Brother will not tollerate dissent - even in the mind. For those with original thoughts they invented Room 101 ...
"More relevant to today than almost any other book that you can think of." Jo Brand
Ministry of Truth
This image has been trying to get out for a while, here's why: The amount of misinformation being pushed about the Scottish independence referendum at the moment is quite breathtaking. Just take a look. The behaviour of the state in deploying propaganda is reminicent of 1984, Distracting the public by demonising foreigners, disabled, and the unemployed , to provide a common enemy - all too evident in real life.
Airbrushing out inconvienient facts and ignoring or rewriting history to suit a political agenda have real-life parallels that I recognise all around me.
1984 was written in 1949 when states could still control the message. That is less true now. It is not as easy to rewrite the story or hide the facts as Orwell imagined in his book. He didn't have Google, Twitter and the internet.
Don't believe what you are told - the information is out there - go find out, and while you are looking, think. Learn how to seperate fact from deceit. Check their sources, look for agendas, think for yourself.
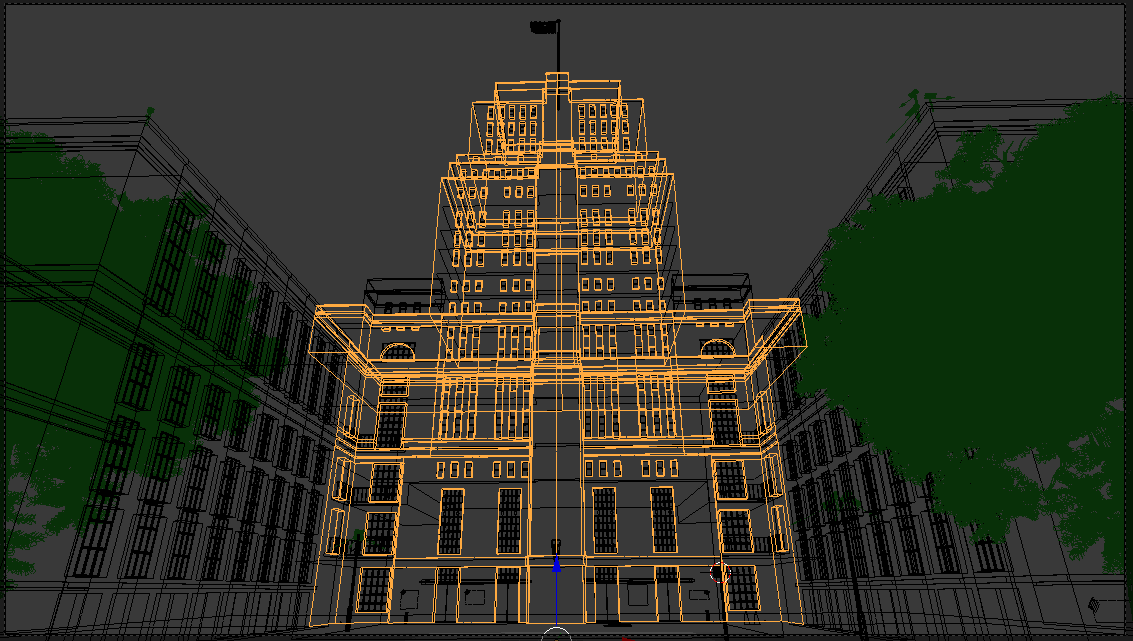
The film version of 1984 used Senate House in London as the Ministry of Truth. A good choice given it's imposing and bleak form.
Wireframe of the model and some alternative shots below...
Completing module 7 in the Architecture Academy. Putting my columns to good work.
Lots of arrays in use, especially on the roof. Good practice at UV unwrapping too. New techniquie learned this module was using a temporary cylinder to snap vertices to a curve, this was used to curve the balcony railing.
Edit: Adding the wireframe view (before rendered as above).
Some columns, this one a composite of Ionic and Corinthian styles, complete with acanthus leaves. The range of styles is actually quite interesting, I can now tell my Doric order from Corinthians. I am creating a Blender file with a model of each so I can link/append then to future models.
Composite Corinthian / Ionic Column
Edit: So I got a bit carried away, and modelled a full set of classical columns:
This module from the Architecture Academy, introduces EIS lighting. I
had not used this before and it is a really powerful way of creating
realistic light patterns from lamps in a scene. Blender has an add-on to import EIS files from lighting manufacturers, detailed in this Blender Artists thread.
Another
painful lesson is the amount of additional rendering time needed in dark
scenes to get rid of noise. The image below is still noticably noisy
in areas, yet was rendering for a whopping 3,000 cycles over 10 hours
to get this far. The long render time partially due to despite turning
down all the subsurf levels on the furniture to zero, the scene was
still too heavy to fit within my GPU memory and needed to be rendered
using CPU.
On composition, I tried to use lines within the wall art on each side of the upper floor to bring the eye to the middle bottom and then a defocussed fern in the foreground to guide over to the lillies.
This week's module for the Architecture Academy was released late. It was supposed to be the interior of the Guggenheim Museum in New York. A bit frustrating, as I am on vacation this week and would have had time to give to it. I'm off to Barcelona at the weekend for some R&R, some relief from my keyboard for a change, so not much prospect of rendering the Guggenheim anytime soon.
However, not to waste time waiting, I had another run through of the external building module. This time working from a glossy brochure from a local builder.
I was quite a way into the modelling before I realised that the image in the brochure was also computer generated. Some of the garden plants are repeated, and the reflections in the car are all wrong for the environment. The image is too perfect, the grass edges at cut with a ruler (and pasted in-place) and no
grunge on the building whatsoever.
That upped the ante, I wanted to do a better job at representing the building than whoever did the photoshopping in the original. I don't think I have quite done that, the original artist did a professional job.
Edit: As is becoming traditional, an update. Improved on the garage door, main door, environment lighting and a couple of textures.
While many of these profiles are standard across the building industry, some are registered designs. We are grateful to SkirtingBoards.com for allowing us to include some of their designs in the set.
Each profile is created as a curve in blender, each curve sits in a group named to make it easy to link/append the curve to your main scene. In your main scene, create your own curve that follows the edge of the room (tip: make sure you use vector handles for sharp corners). Now in the settings for your main curve, add one of the profile curves provided as a Bevel Object. You should see the skirting board appear in your room.
It might be necessary to add an edge-split modifier to your main curve to create nice sharp corners.
Week 2 of the Architecture Academy stepped through creating an exterior view of a house from a groundplan.
Some early frustrations with Mr Price on the plans provided, there was no way to make the side view and the top views match up, and no front view provided at all, so it was necessary to fill in some gaps and imagine what the front looked like without a front elevation to go on.
With the modelling out of the way, the topic moved onto texturing, I learned quite a few tips and tricks for UV unwrapping and layering textures to get the right effect, even for the bits I did know, some useful guided practice.
Then adding foliage, straightforward.
Finally adding grass - what a nightmare. My trusty workstation, which is a couple of years old now, my fairly recently upgraded Nvidia 580 GPU rendered useless as it didn't have enough RAM to hold the scene, really stuggled to handle the particle systems.
There really needed to be around 250,000 x 20 child particles to make the grass look convincing. Max I could handle was 100,000 x 20.
After a lot of messing around, simplifying the scene wherever possible, loading lower res texture files, dialling back a few subsurf levels and bevel amounts, I managed to get a render going that would not crash my system. Then, tweaking was painful, two hours to see the result of any adjustment and a further hour each time to get back in balance where my system would not crash. Time to get really precise on the adjustments, it just took too long to be thrashing about in the dark.
I ended up making the ground texture look as much like moss as possible
with heavy "bump" applied, colour matching the ground with the grass, and
weighting the secondary clover particle system to the area immediately
infront of the camera as much as possible. Even with that, I needed to
add additional vignetting to the bottom of the image in post-processing
with a box mask to take the eye away from the close-up areas of lawn.
The final render took 4 hours to get 500 passes. Although it was a struggle, I am quite pleased with it.
Edit: I should know better by now. Every time I rush to post a result, and say I am pleased with it, I look at it next day and I'm no longer pleased with it.
At the very least, you should, time permitting, let your images rest and cast a fresh look on them before pressing the "send" button. {Bertrand Benoit}
Here is the better version:
Furniture and plants scaled down to 75%, re-did the grass and daisys, lowered the environmental lighting for stronger shadows, dropped the over-done bottom-half vingnette, desaturated the sunflowers, and rendered for another 4 hours.
So, just completed week 1 of the Architecture Academy, a modern lounge. Took quite a long render time @ 800 passes = 2hrs 47mins. Andrew's rig apparently took 20 mins.
Blender 2.68 was released just as I was completing the scene, so I was able to render out using GPU for the particle systems, although I needed to upgrage my NVIDIA drivers to handle the scene as I was getting errors when trying to render with GPU.
To promote the launch, there is a preview tutorial on producing a simple interior scene, which I have just completed:
Ontop of the tutorial, I retextured one of the book models, pretty easily achieved by taking one from my bookshelf and scan the cover using my muti-purpose printer/scanner. Messed around with the blind textures and adding a different image to the wall hanging. Also added a wee dram for the side table, modeling the bottle from a real one I have tucked away. The whisky level in the real one is a bit lower than shown in the model by the time I finished.
The tutorial was basic, and although I did learn some tips on using HDR files, not a lot of new information in here. However, where Andrew excels is in boiling the task down to its essential elements with attention to composition and colour to come up with pretty decent images.
As an individual tutorial on architectural interiors, I learned more in the CGCookie tutorial last April.
The price-tag for The Architecture Academy course is a hefty $500 US. Since I am using Blender for my own enjoyment, and not a career move or anything I plan to make money out of, the price is off-putting. However, I am still seriously considering signing up. I really enjoyed The Nature Academy, and following that course definately took my skills to a new level. My output has slowed in recent months and the timetable for the course is the sort of push I think I need. With the added bonus of being able to fall behind and catch up later as real-life work inevitably gets in the way.
Update: I went ahead and signed up - on the understanding this is my birthday gift sorted out for this year ;)
A small fishing boat, modelled for fun. Created in Blender and rendered in Cycles, with wave flecks added post-production in Photoshop.
Update: Went back to edit the ropes, sort out the lifebelts, add some more deck detail, increase the sea resolution and so on, I am much happier with this version below...
Update: So I have been learning a bit more about using HDR files for the environment in the Architecture Academy. These fishing boat images used an old-school sky-dome set-up. Using an HDR (High Dynamic Range) file from the free intro to the Architecture Academy as an environment texture instead gave some immediate improvements. Voila...
I recently bought the book: "The Animator's Survival Kit" by Richard Williams. So starting to get to grips with walk cycles and other animation magic and alchemy.
Not my first attempt :) but the first I am semi-happy with, I decided to take Blenderella out for a nice stroll along the beach.
I'm just back from a week's vacation in New York with my family. I wanted to make a city scene in Blender while the images of the city are still fresh.
I took the basic approach for building the city from Andrew Price's city tutorial, but I took most things further than he attempted. I wanted to be able to animate the city and zoom from height down to street level. To acheive this, I needed to use low poly models as far as possible but be good enough and detailed enough for close up animation.
Here are some stills from the finished set-up.
City Overview
Some quick stats. The city has 1,901 buildings. You will see where the 1 comes from at the end. The buildings are made up of 20 unique models that are arranged via a particle system over a grid of verticies (technique courtesy of Andrew's tutorial).
One touch I am especially pleased with is adding a lattice to the main ground plane that allows hills to be created across the city to give additional variation in height for the horizon. By having the roads and other elements also linked to the lattice, everything stays in alignment.
Descending to street level
Most of the effect comes from textures. 65 image textures (most of the building ones from CGTextures.com), with masking to vary the reflection effects for windows and shop fronts and to add some displacement to flat surfaces.
Street Level.
The street we were staying in in Manhattan had a view just like this,
with the sky visible at the end of a long "canyon" of skyscrapers.
I have fixing the wheel arches of the vehicles on my to-do list. I have never done a vehicle model. Apart from the wheel arches, I enjoyed making these low poly versions. I must get round to adding vehicle modelling to my skills at some point soon!
Broadway
Some more stats: the city contains a lot of vehicles, all of them animated and moving along pre-defined paths. 84 Taxis, 9 Police cars, 8 blue sedans, 8 black SUVs.
It was quite fun making sure there were no collisions at junctions as I worked on the speed and timing of the traffic. I quickly realised there was just no way of getting the streets to feel conjested at this scale, it would take many thousands of vehicles. For a heavy traffic scene, I would need to model one or two streets only and split the action into smaller cut scenes. My cover story for this city is that the animation was done early in the morning, see the sun angle and long shadows supporting my claim ;)
Wee Shuftie Tower
In New York, I saw that Donald Trump has at least two towers with his name on them. He is in the process of building a golf course where I live in Aberdeen. Well, this is my city, so.... voila - Wee Shufty Towers. It is actually modelled after one of Donald Trump's towers in Chicago.
I added some static billboard people to this final scene. It was not practical to animate enough people across the city to be convincing, and during the animation, lots of people standing still looks really odd. If anyone has ideas on how to animate low poly crowds, I would be very interested to hear.
Blue Skies
Finally, some nice blue skies to go with Wee Shuftie's new corporate headquarters.
Here is the rough render animation I did to test timings. I kept the render times for this version to about 30 seconds per frame with 10 iterations of Cycles in Blender. But with my final version now at 1,167 frames, even this rough version takes about 15 hours to produce.
The test animation was well worth doing, it produced a list of items I was able to work on to improve.
Road markings wrong scale - fixed
Cars off-road - fixed
Scaffolding too short - fixed
Landing vibration on camera too severe - fixed
Need to fake rotating wheels on cars in close-up - fixed
Need to create reflection masks for shop fronts - done
Add loop-cuts to bulding rooftop balconys to improve close-ups - done
Fix traffic light sequence - not done, decided to run the red light :)
Scrap the end-scene with dodgy looking studio and replace with Wee Shufty Tower as a more fitting corporate HQ.
Spotted a lamp-post off the kerb - fixed
Pavement (sidewalk) textures need replaced - fixed
Remove un-needed lamposts and traffic lights from parts of the city not seen. I originally had lights on every single street!
Average out the burst of speed on landing - unrealisic. - to do
Smooth out the turn on the first corner - to do
Add billboard people to end scene. - done
Step through each frame looking for boring shots and adjusting elements and composition in each - still tweaking
I am still tweaking frames before hitting the go button for the final render. I will give it a few days to make sure I am happy before doing the big render run.
UPDATE: I realised I could use the same technique to add cars as used to add buildings. This made it possible to add a few thousand more cars to the scene. You can almost hear the honking!
I also narrowed the road to more realistic proportions on the streets but left the avenues nice and wide. To do this I had to go back to the basic structure of the scene and re-work quite a bit. I also had to model additional low buildings as the overall density became too much.
This is starting to feel right, tweaking continues...