Showing posts with label The Nature Academy. Show all posts

Sunday, 18 March 2012

Desert Scene

At last some free-time.  I've not been able to post anything for a while. 

The Nature Achademy is re-running for it's 2nd intake and there have been a couple of additional tutorials added to the course.  This is one of them,  a desert scene.  It is pretty close to the tutorial,  I upped the number of strand particles for the grass and I added some displacement to the foreground rock.

Desert Scene

Sunday, 18 September 2011

Mountain Loch - Revisited

I was quite please with my Mountain Loch image, and posted it to BlenderArtists.org. I got some really good comments back about the scaling of the trees v's the mountain and did some updates.  I also received some suggestion to try different focal lengths on the camera settings.

I am not a photographer and pretty clueless about the camera settings.  After a bit or research, I find that lower focal lengths give a wide angle, while longer focal lengths give zoom.  After a bit of experimentation, I have two new versions of the mountain scene.

Mountain Loch v2 - 90mm focal length "zoom"
V2 differs from the previous post in that I added lots more trees (about 500 for the scene) in an attempt to sell the scale of the (small) mountain.  The scene reminds me of the small islands on the west coast of Scotland more than some monster mountain.  It was never intended to be the Matterhorn :)

Mountain Loch v3 - 23mm focal length "wide angle"
The wide angle shot in V3 is very unforgiving on poor foreground detail,  I added some grass coming through the snow,  without this, your eye has nothing to settle on in the foreground and it is too easy to pick fault with the close-up parts.

Saturday, 3 September 2011

Toadstools in the Forest


The Week 9 theme for The Nature Academy is a misty forest scene.  I deviated from the tutorial quite a bit to get the look I was after, I used my own backdrop and made my first seamless texture for the ground.  The toadstool idea came from a family walk a couple of weekends ago, the reference photo is below.

Edit:  A slight tweak to the foreground plants. Original is below.

Toadstools in the Forest


Original - tweaked the foreground foliage


Here is the reference pic for the toadstools:


For my fellow students at The Nature Academy,  here is the backdrop image and ground texture.

Modelling and layout


Let me know what you think?

Saturday, 27 August 2011

Mountain Loch

Week 8 is modelling and texturing a snow-covered mountain.   A lot of people have been sticking strictly to the tutorial settings, there are a lot of identical looking mountains out there. Here is my attempt to do something a little different.

Click on an image for a larger size.

Edit:  tweaked the water edge and repositioned the camera a little.

Mountain Loch


I did the original mountain tutorial while it was available as a taster session for The Nature Academy.  I have dug out my old render for comparison.  We need to name this mountain - "Mount Andrew".

Mountain Loch - take 1

Mount Andrew

Saturday, 20 August 2011

Seascape

Week 7 of The Nature Academy,  seascape.

EDIT:  The animation has finished baking, here is the video:


The basic modelling for the sea surface was surprisingly easy, using the Ocean Generator.  However. the tutorials did not cover creating the illusion of distance over the sea surface and produced a bumpy horizon.  That is ok for a shot taken at water level or rough seas but not for a camera placed more than about a meter above the surface.

After a lot of trial an error, I found that using a lattice on top of the generated ocean surface allowed the mesh to be flattened as you get further from the camera and stretched to create some real distance and fill the camera view.

Seascape in Blender
Note: I tried animating a shark fin cutting through the water but until I figure out how to have that interact with the surface, it looks too fake to post just yet.

Here is the lattice set-up:

Lattice set-up to flatten horizon
  1. An inner 2x2 lattice covering the ocean mesh.  After the lattice modifier is added to the ocean,  scale the back edge on the Z axis to zero.
  2. An additional outer 1x1 lattice added to the ocean mesh under the 1st lattice modifier.  This allows you to scale out on the X axis to fill the scene.
  3. After the lattices have been created, the ocean mesh can be moved and rotated to avoid repetition showing up in the view.

Monday, 15 August 2011

Thistles

Thistle
I adapted the week-6 tutorial and modelled some thistles.  The head and spikes on the bulb are both particle systems,  the leaves have both modelled spines and a coating of particle spines.

I thought the scene suited mountains as a backdrop rather than a tree-line and I really like the fog effect.  Edit:  I really hate the fog effect


Let me know what you think?

Also, this is the reference image for the leaf, I still have not got this quite right.  Edit: reasonably happy with the leaves now.


Hmm, another EDIT,  leaves not quite right.  Original below, new one above.


Light fog - this is better:
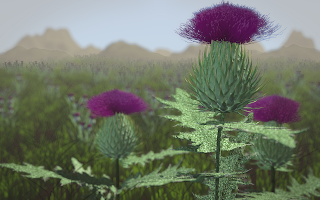


Edit:  After sleeping on it, I didn't like the heavy fog so much.  The original is below, I replaced the image above with a new one.


Full fog:

Thistles

Saturday, 13 August 2011

Week 6 - Flowers

Week 6 result - modelling daisys!

I might give a prize for the correct number of bugs in the picture.

Daisys

Created in week 6 of The Nature Academy at BlenderGuru.com

Saturday, 6 August 2011

Week 5 - The Loch

Been away for work most of the week,  managed to get some catch up done on week 5.  Here is my still image of the Loch.


I am still working on an animation.  Getting the ripple speed correct has been a challenge and also stopping my lilly-pads jumping out of the water or flickering.  All anti-aliasing is turned off for the animation.  I think it still works (and much faster to render).


Experimenting with transparency of the water seems to help but significantly darkens the scene - here is a still:

Friday, 29 July 2011

The Nature Academy, Week 4 - Plants

Here is my coursework for week 4, modelling plants.


Created using Blender plus an Ivy Generator and following The Nature Academy at Blenderguru.com

I tried to go a little beyond the coursework by adding additional plants in the mid-ground to improve blending with the background and tried to create some openness and depth to the scene.

Edit:  Added this into an animation:


Edit: Fixed the ivy leaves pointing in the wrong direction.  Separated the plants in the mid-ground onto its own render layer so that the colour and alpha could be blurred to better match the background.  Previous version below for comparison.


Edit:  Fixed some issues with the mid-ground textures having a weird effect against the backgound and updated the main image above.  Also added more mid-ground height and a very slight fog to help blend with background.  Original is below for comparison ...

Monday, 25 July 2011

The Nature Academy week 3 - Trees, final - FINAL

Hmm,  I couldn't leave it,  I moved the Scots Pine much closer to camera and increased the grass.  I am much happier with this version.


Note:  click on any of the pictures on this site for a larger version.

Edit:  one last tweak made,  fixed a texture issue on the pine,  scaled the foreground heather up a bit, added roots to the pine, made the scree a bit darker. 

Saturday, 23 July 2011

The Nature Academy week 3 - Trees, final

Phew, this one pushed my PC to it's limits.  Finally there.

The Last Tree in the Forest
Biggest difficulty was figuring out how to separate the tree to it's own render layer and then re-integrate it properly back into the scene.  I also had a repeated crash when trying to work on the compositing nodes.  I updated Blender from 2.57 to 2.58a and it sorted the problem.

Thursday, 21 July 2011

Messing about with Arbaro

Getting to grips with the Arbaro programme. This looks pretty powerful, especially when adding textures and modifiers for close-up work.

Experimental heather in Arbaro.


Here are the settings:
<?xml version='1.0' ?>

<arbaro>
  <species name='Calluna vulgaris'>
    <!-- general params -->
    <param name='Shape' value='2'/>
    <param name='Levels' value='3'/>
    <param name='Scale' value='1.0'/>
    <param name='ScaleV' value='0.1'/>
    <param name='BaseSize' value='0.1'/>
    <param name='Ratio' value='0.0080'/>
    <param name='RatioPower' value='1.0'/>
    <param name='Flare' value='1.5'/>
    <param name='Lobes' value='4'/>
    <param name='LobeDepth' value='0.0'/>
    <param name='Smooth' value='0.5'/>
    <param name='Leaves' value='200'/>
    <param name='LeafShape' value='disc4'/>
    <param name='LeafScale' value='0.01'/>
    <param name='LeafScaleX' value='0.5'/>
    <param name='LeafQuality' value='0.3'/>
    <param name='LeafStemLen' value='0.1'/>
    <param name='LeafDistrib' value='3'/>
    <param name='LeafBend' value='0.3'/>
    <param name='AttractionUp' value='1.5'/>
    <param name='PruneRatio' value='0.0'/>
    <param name='PrunePowerLow' value='0.5'/>
    <param name='PrunePowerHigh' value='0.5'/>
    <param name='PruneWidth' value='0.5'/>
    <param name='PruneWidthPeak' value='0.5'/>
    <param name='0Scale' value='1.0'/>
    <param name='0ScaleV' value='0.0'/>
    <param name='0BaseSplits' value='0'/>
    <!-- level 0 -->
    <param name='0DownAngle' value='0.0'/>
    <param name='0DownAngleV' value='0.0'/>
    <param name='0Rotate' value='0.0'/>
    <param name='0RotateV' value='0.0'/>
    <param name='0Branches' value='5'/>
    <param name='0BranchDist' value='0.0'/>
    <param name='0Length' value='1.0'/>
    <param name='0LengthV' value='0.0'/>
    <param name='0Taper' value='1.5'/>
    <param name='0SegSplits' value='0.0'/>
    <param name='0SplitAngle' value='0.0'/>
    <param name='0SplitAngleV' value='0.0'/>
    <param name='0CurveRes' value='5'/>
    <param name='0Curve' value='10.0'/>
    <param name='0CurveBack' value='10.0'/>
    <param name='0CurveV' value='100.0'/>
    <!-- level 1 -->
    <param name='1DownAngle' value='80.0'/>
    <param name='1DownAngleV' value='0.0'/>
    <param name='1Rotate' value='55.0'/>
    <param name='1RotateV' value='0.0'/>
    <param name='1Branches' value='20'/>
    <param name='1BranchDist' value='1.0'/>
    <param name='1Length' value='0.9'/>
    <param name='1LengthV' value='0.0'/>
    <param name='1Taper' value='1.5'/>
    <param name='1SegSplits' value='0.0'/>
    <param name='1SplitAngle' value='10.0'/>
    <param name='1SplitAngleV' value='0.0'/>
    <param name='1CurveRes' value='8'/>
    <param name='1Curve' value='20.0'/>
    <param name='1CurveBack' value='-45.0'/>
    <param name='1CurveV' value='120.0'/>
    <!-- level 2 -->
    <param name='2DownAngle' value='10.0'/>
    <param name='2DownAngleV' value='0.0'/>
    <param name='2Rotate' value='60.0'/>
    <param name='2RotateV' value='10.0'/>
    <param name='2Branches' value='20'/>
    <param name='2BranchDist' value='1.0'/>
    <param name='2Length' value='0.9'/>
    <param name='2LengthV' value='0.0'/>
    <param name='2Taper' value='1.5'/>
    <param name='2SegSplits' value='0.0'/>
    <param name='2SplitAngle' value='0.0'/>
    <param name='2SplitAngleV' value='0.0'/>
    <param name='2CurveRes' value='6'/>
    <param name='2Curve' value='2.0'/>
    <param name='2CurveBack' value='20.0'/>
    <param name='2CurveV' value='50.0'/>
    <!-- level 3 -->
    <param name='3DownAngle' value='30.0'/>
    <param name='3DownAngleV' value='0.0'/>
    <param name='3Rotate' value='120.0'/>
    <param name='3RotateV' value='0.0'/>
  </species>
</arbaro>